How to Change Epson Stylus SX235W Ink Cartridges
Changing ink cartridges isn’t rocket science, but it is a little more complicated than simply taking one cartridge out and slotting in another one. If you need to replace one or more cartridges in your Epson Stylus SX235W, then this is the guide for you. We take you through the whole process, so you can get back to printing and scanning. Any time you are going to replace an ink cartridge, there are a couple of things you need to do first:
First, buy your ink. If you take an old cartridge out and don’t replace it immediately with a new one, you risk letting the ink heads dry out, which means your printer won’t be able to work.
Second, check that the ink is out. When an ink cartridge is low, the ink light will flash orange. When a cartridge is completely empty, the light will be a constant orange.
Replacing an Epson Stylus SX235W ink cartridge
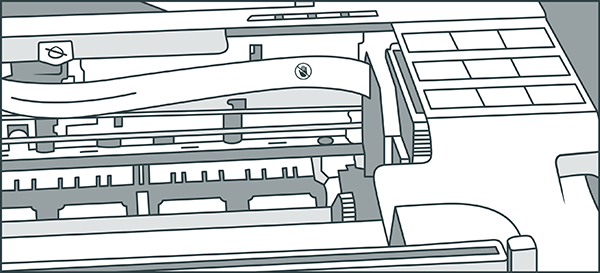
1. Lift the scanner part of the printer to expose the print head, the moving part of the printer that holds the ink cartridges.
Important: Don’t touch the print head or the white ribbon, and wait until the print head has stopped moving before continuing.

2. Press the stop button. This is the button with an upside down triangle in a circle at the far right of the control panel.
3. Now you should be able to see if one cartridge is empty. Continue to press the button to check each cartridge in turn. You can also do this step on your computer. Epson Status Monitor (called the Epson Status Monitor 3 in Windows) will show you which cartridges are low or out.
4. Take the new replacement cartridge and shake it four or five times while it is still in the packaging.
5. Remove the cartridge from the packaging.
6. Remove only the yellow tab from the new cartridge.
Take care not to remove any other pieces from the cartridge. And don’t touch the green chip. If you do, it may cause the cartridge to malfunction.
7. Returning to the printer, pinch the empty cartridge between your fingers to release the plastic tab at the back.
8. Pull the cartridge straight up to remove it. Put the old cartridge in a suitable container for recycling later.
9. Slot the new, unwrapped cartridge into the space. Press down until it clicks into place.
10. Repeat this until all the empty cartridges are replaced.
If at any point you get ink on your skin, you can wash it off with soap and water. If it gets into your eyes, thoroughly flush your eyes with water, and seek medical help if your eyes continue to feel irritated after rinsing. If ink gets into your mouth, spit out what you can and seek medical advice straight away.
11. Close the printer.
12. Press the stop button. This will start the 2-5 minute process of charging the ink. The power light will start flashing, and while the printer is doing this, do not turn of or unplug the machine.
13. When the power light stops flashing and remains on, the installation will be complete.
In summary, here’s how to replace an Epson Stylus SX235W ink cartridge:
- Lift scanner to expose printer head
- Press stop button
- Remove yellow tab from new cartridge
- Place new ink cartridge in printer and hold until it clicks into place
- Close printer and press stop button to charge the ink
Now go off and enjoy printing and scanning all the pages and photos you want!
Click on the image below to buy ink for this printer.
